What is better, a dry or wet exhaust?
A dry exhaust is a simpler system than a wet exhaust. However, the wet exhaust does have significant advantages. Which will you choose? In this article, we’ll guide you through this dilemma, explaining the difference between a dry and wet exhaust, and outlining the various types of cooling water systems. Shall we dive in?
What is a dry exhaust?
A dry exhaust system is similar to a car’s exhaust. A pipe is connected to the exhaust manifold via a flexible joint and directs exhaust gases directly outside through the silencer. The engine’s cooling water is added to the exhaust system externally, or much later on.
The pipes and tubes are often made of steel to prevent them from melting due to the heat. It is a simple system, but has two major drawbacks:
- it gives off a lot of heat (up to 600 degrees at the source) and the system produces a lot of noise.
- A dry silencer is often desirable to dampen the noise.
Right, now that we know what a dry exhaust system is, let’s move on to the next issue.
What is a wet exhaust?
With a water-cooled exhaust (wet exhaust), the manifold is fitted to the engine. The manifold is often custom-made and cast iron. A wet exhaust can also often be recognised by the frost plugs in the cooling channels. The heated cooling water in the engine is around 60 to 90 degrees when it leaves the engine and can therefore still be perfectly used to cool hot exhaust gases of 600 degrees.
In the initial section of the exhaust, the water and gases are not yet mixed. This prevents water from entering the engine and impeding the gases. The gases must be able to exit the engine smoothly to avoid reducing engine performance. Shortly after the engine, the gases and liquids combine and exit the engine via the exhaust.
Differences between a wet and dry exhaust
The main differences between a dry and a wet exhaust are the temperature and the noise. A dry exhaust is louder than a wet exhaust, and the temperature of a dry exhaust system is higher than that of a wet exhaust. The difference in temperature between a dry and wet exhaust is quite noticeable. With a wet exhaust, the noise is muffled by the water. A rubber exhaust hose then offers greater flexibility and immediately increases the lifespan of the exhaust.
With a lower-mounted engine, as is common on many yachts, good water drainage is especially important. The hull of the boat can indeed influence the placement of the exhaust and the functioning of the system.
The different types of cooling water systems
There are three types of cooling systems:
- Direct cooling of the boat: A cooling water system in which the engine block is pumped with canal water via a rubber impeller pump.
- Indirect cooling of the boat: a separate cooling water system (also called an intercooling or heat exchanger system) in which you have coolant in the engine and pump cooling water through a heat exchanger using an impeller pump.
- Indirect cooling of the boat: a keel cooling system, where cooling pipes filled with coolant run under the boat. The latter system does not allow for a wet exhaust, unless an additional impeller pump or electric pump is fitted.
Converting a dry exhaust to a wet exhaust system
If you want to experience the benefits of a wet exhaust system, you can convert your dry exhaust. Complete exhaust sections are available. Alternatively, you can opt to add water to your existing dry exhaust system, with only the initial section remaining uncooled. While the conversion may require an investment, it’s a job that a competent DIYer can manage with great satisfaction.
Wet exhaust system with waterlock and silencer
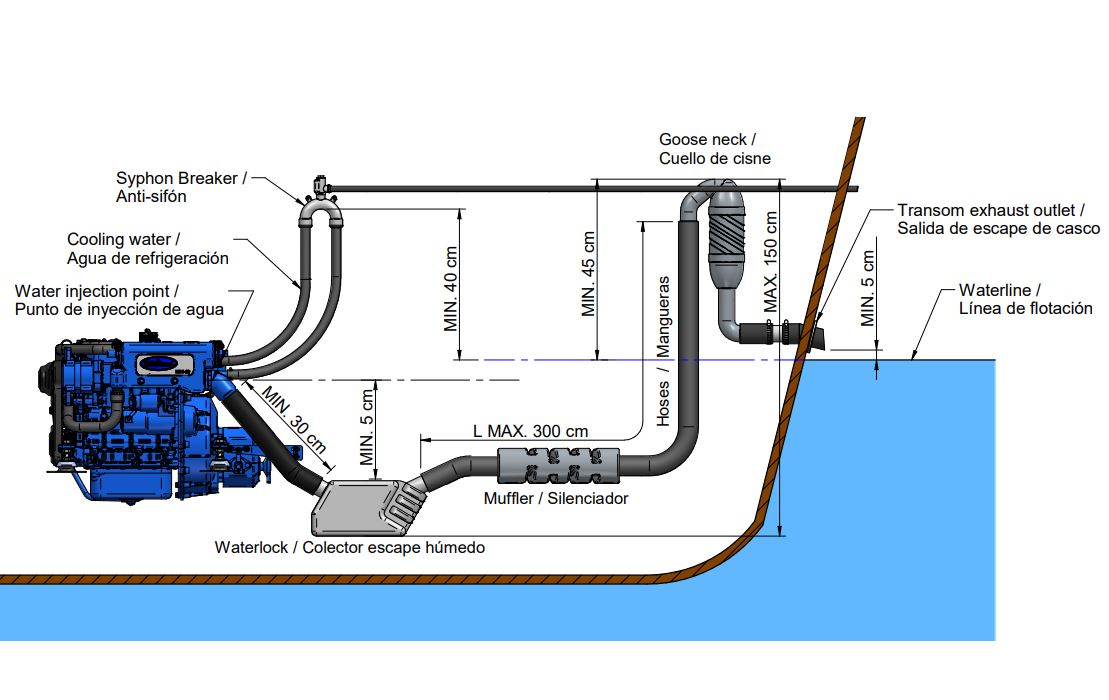
A wet exhaust system comprises the following components (from start to finish)
- A water intake pipe under the boat with a shut-off valve to stop the supply for repair or maintenance.
- A seaweed filter as an inline filter to prevent any harmful material from reaching the impeller pump.
- A suction pump on the engine (impeller or raw water pump).
- If converting from keel cooling to indirect cooling: a heat exchanger with a water-cooled exhaust manifold.
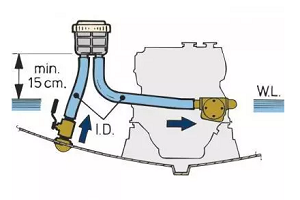
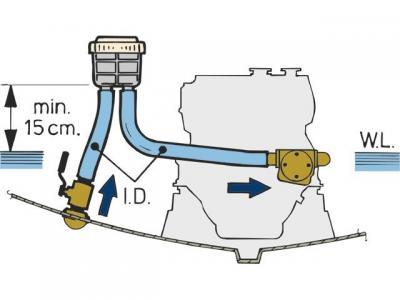
- A water injection fitting, fitted after the exhaust manifold, which adds cooling water with an aerator to prevent the water from siphoning back into the engine when the engine stops.
The use of a so-called waterlock is recommended for a wet exhaust. It collects the water and uses overpressure to push the water up through the exhaust with the exhaust gases. The waterlock also dampens sound by impacting the water.
The goose neck acts as an extra safeguard to prevent water backing up when the engine is positioned lower, as is the case in most sailboats.
The silencer can still be fitted as an additional option; view our options in the category exhaust damping.
With wet exhaust systems, you can also use a muffling and flexible exhaust hose. The whole thing is securely fastened with stainless steel hose clamps.
Would you like advice about the exhaust system? Get in touch via the contact page.
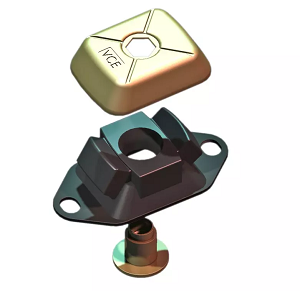

 So what is the optimal engine mount?

 A fuel tank is often installed inside. In the evening, the tank cools down and warms up again during the day. The oxygen that moves through the warming and cooling process always contains moisture. Warm air that cools down forms water droplets (rain), and this condenses against the walls of the tank. This water drips down and settles at the bottom of the tank, below the diesel. Diesel has a lower specific gravity than water. A practical tip is to keep the space above the fuel as limited as possible. Always fill the tank completely before leaving the boat unused for a long time (for winter storage with winter diesel). After all, the less space there is at the top of the tank where oxygen and condensation can settle on the walls of the tank, the better. Warm and moist conditions are also perfect for diesel bacteria to grow rapidly, but even during winter, diesel bacteria can thrive. A clean and dry tank vent in the right place is therefore recommended. Rain and wave action Even incorrect placement of, for example, the fuel fill or vent can quickly cause water accumulation in the tank. Rainwater that can seep in through an external vent, or splashes of waves hitting the deck, can get into your tank, so this needs to be taken into account. Also, pay attention to a proper seal of the diesel fill cap on the outside and periodically check the seals in the cap. Is this new? Diesel today must contain less sulfur than in the past, as required by the government. Sulfur that you burn is highly polluting for the environment, but sulfur used to prevent bacterial growth in the past. In addition, a few percent of biodiesel is now added to diesel. Biodiesel is made from plant-based products and is therefore interesting as the world’s oil reserves are depleting. But biodiesel has the property of quickly attracting water and contains a higher percentage of microbes. What can you do?
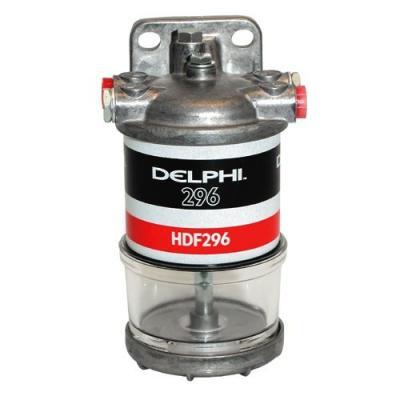
  If possible, check visually if you can see water formation in the tank, often you’ll see a large “bubble” of water at the bottom. If you have never checked or drained it, that’s a good start. Do you frequently encounter this problem? Look at what the cause might be, as described above, such as malfunctioning venting, etc. The fuel supply pump that delivers fuel to the engine also often pumps the diesel back into the tank several times through the return line. This way, your tank is often kept clean and filtered. A proper filter installation with a water separator can catch water from your tank. Since water is heavier than diesel, it is collected at the bottom of the glass. Through the glass, you can also see whether your diesel is clean or maybe cloudy, which indicates contamination. Do you experience a lot of contamination and have trouble draining the tank? Then you can opt for an external pumping system that continuously circulates the diesel through a filter set and separates the water.