When did you last change the coolant on your inboard engine? Some boat owners can tell you this immediately, while others have to dig deep to recall. If your answer is close to ‘I don’t know’, then this blog is for you.
We’ll explain why coolant is so important, how you can replace it yourself step-by-step, and which coolant is suitable for your inboard engine. Because a well-functioning cooling system is vital for the health of your trusty engine.
Why is it important to replace coolant?
Coolant primarily regulates your engine’s temperature. If there’s too little coolant in a water-cooled inboard engine, the engine can overheat. In the worst-case scenario, the engine can seize or parts can become deformed. This often cannot be repaired.
Besides regulating temperature, coolant also protects your engine against freezing, corrosion, and limescale buildup. It prevents damage to the engine block, pipes, and heat exchanger. This is because fresh coolant contains not only antifreeze but also additives that combat rust and deposits.
The issue with coolant is that it loses its protective properties over time. The active ingredients (such as corrosion inhibitors) become depleted, which can lead to rust and deposits. Therefore, it’s necessary to regularly replace the coolant, usually every 2 to 5 years, depending on the type of engine and the manufacturer’s guidelines.
The risks of delaying coolant replacement
Before we dive into the step-by-step guide, let’s get more specific about the risks of delaying coolant replacement. When we tell customers this, it often makes them sit up and take notice: it’s not something that can be put off.
1. Overheated engine
Coolant flows through the engine block and via the heat exchanger or radiator to dissipate heat. If outdated coolant can no longer do this effectively, the temperature will rise. You’ll often see this reflected on the temperature gauge, if you have one. If you continue to drive, you risk components like the head gasket failing, and then you’ll be in for a heap of trouble.
2. Corrosion in the cooling system
Over time, coolant loses its anti-corrosive properties. Metal parts such as aluminium cylinder heads, pipes, and the water pump become more vulnerable to corrosion. Rust particles can contaminate the system and cause blockages, for example, in the heat exchanger or the expansion tank (if you have one on board). The consequence: even less cooling, with all the associated risks.
3. Sludge and deposits
Old coolant can turn into a gummy sludge. This happens because the protective additives break down and react with dirt or moisture in the system. This sludge impedes flow, increases the risk of leaks, and can even affect the entire cooling system over time.

Step-by-step guide: replacing your boat’s coolant yourself
Time to get ahead of any issues and act now. Are you planning to top up or replace your coolant yourself, perhaps for the first time? Don’t worry, we’ll guide you step-by-step on how to do this job safely and efficiently.
The first tip: make sure your engine is completely cooled down before you start!
Eessentials list
- New coolant (suitable for your engine)
- A drain pan or sturdy bucket
- A medium-sized funnel
- A screwdriver or appropriate spanner
- Protective gloves
- A bleeding key (optional)
- An old cloth or sponge (for spills or cleaning)
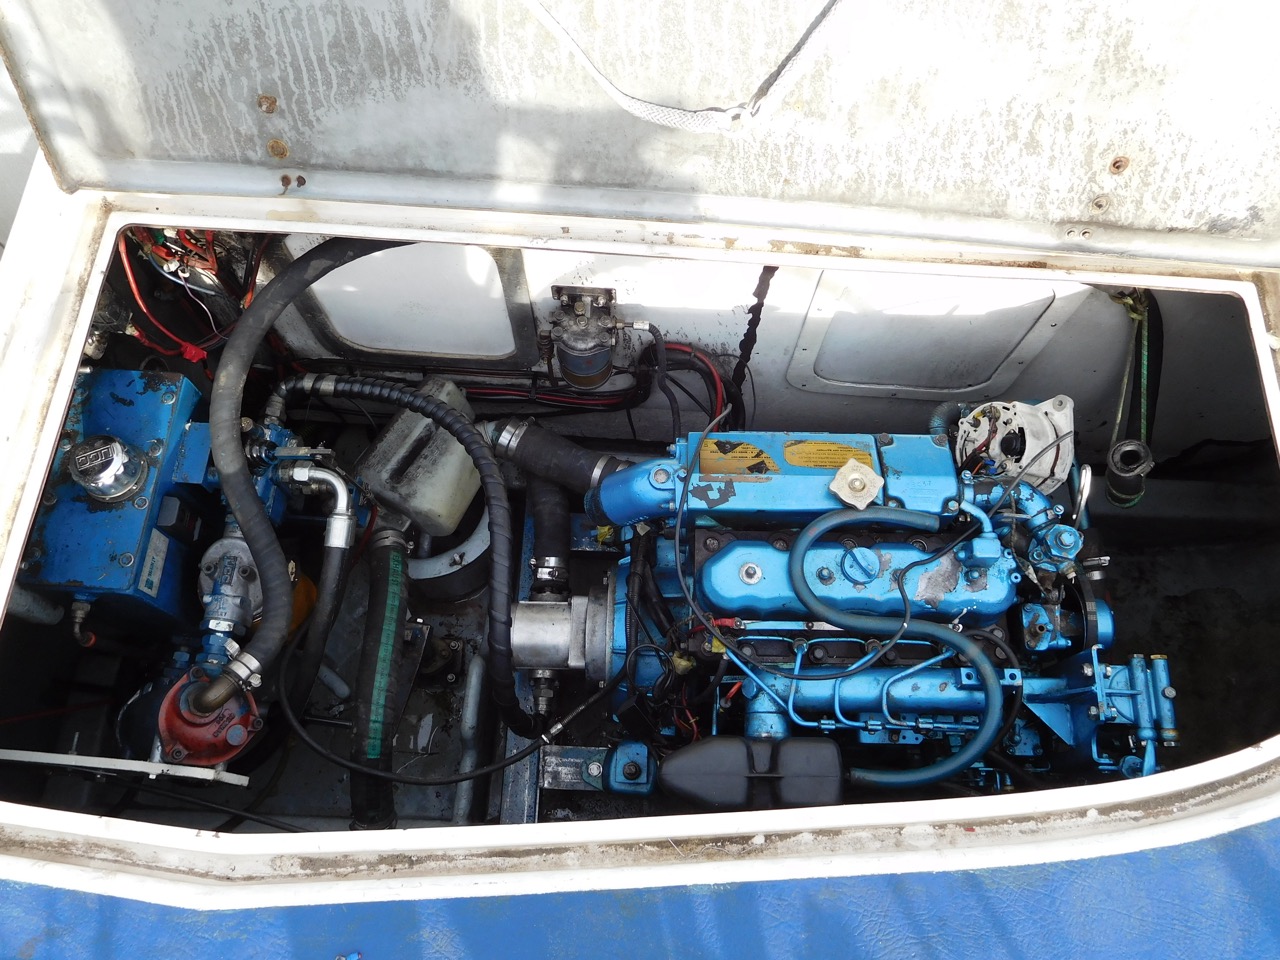
Step 1: Check the cooling system of your inboard engine
Check the coolant level. Many engines have a translucent tank with ‘min’ and ‘max’ markings. Is the level too low, cloudy, discoloured or rusty? Then it’s time to act. If your engine doesn’t have an external reservoir, you’ll need to check the system yourself – for example, at the heat exchanger or the expansion vessel.
Step 2: Drain the old coolant
Locate your engine’s drain plugs. These vary by make and model and are often found low down on the engine block or near the heat exchanger. Some engines have a small hose or fitting at each drain point to make draining easier. You can often find instructions for your specific engine make on how best to drain the old coolant. Make sure you have a collection pan ready and drain the coolant as completely as possible. Many engines will yield 3 to 5 litres of coolant from the system.
Step 3: Flush the cooling system (optional, but advisable)
Does your old coolant look dirty or brown? If so, flush the entire system with clean water and a
Step 4: Top up with new coolant
Time to pour in the new coolant. Use a funnel and slowly top up to the recommended level. Note: some engines have multiple filling points or a separate circuit for, for instance, a boiler, which can make filling a bit more complicated. Check what applies to your engine. The correct coolant depends on your engine type, more on that later.
Step 5: Bleed the cooling system
After topping up, you need to bleed the system. Start the engine and let it idle so the coolant circulates properly. If applicable, turn on the heater or boiler if it’s connected to the cooling system. Look for air bubbles escaping and keep a close eye on the coolant level. Top up if the level drops. Caution: do not let the engine run for too long without sufficient fluid; not all alarms work equally well with a low level. This can cause damage.
Does your engine have a manual bleed point? If so, use a bleed key and follow the manufacturer’s instructions.
What coolant do you need for your inboard engine?
Not all inboard engines are the same, which is why there are different types of coolant. Choosing the right one is important to prevent problems with gaskets, pipes, or even the engine block. Below, we explain two commonly used coolants, each suitable for a different type of engine.
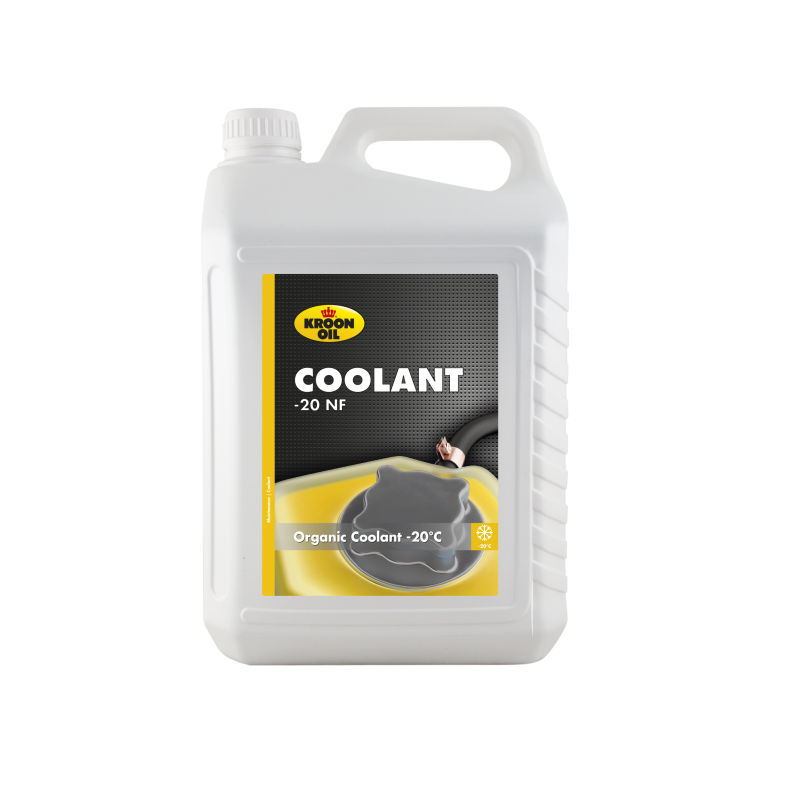
Coolant -38 Organic NF
If you have a fairly new inboard engine with aluminium components, then Coolant -38 Organic NF is a good choice. This coolant is silicate-free, universally applicable, and based on Organic acid technology (OAT). The product is made from mono-ethylene glycol and demineralised water.
This Kroon Oil coolant offers excellent protection for all metals found in modern engines and cooling systems. It is compatible with gaskets and hoses, provides high resistance to foaming, and effectively protects against corrosion – including in aluminium cylinder heads.
Coolant -38 NF is suitable for use all year round in the cooling systems of modern petrol and diesel engines. Use the fluid undiluted for frost protection down to -38 °C. Replace this Coolant at least every three years for optimal performance.
Coolant G11 Long Life
If you have a slightly older inboard engine, then Coolant G11 Long Life is a commonly used option. This fluid is based on nitrite, amine and phosphate-free technology and offers protection down to -37°C.
Thanks to active corrosion inhibitors, this coolant provides long-lasting protection for components such as the water pump, radiator, and seals. Special additives prevent the formation of sludge and deposits in the system.
This coolant is suitable for engines where the manufacturer specifies G11-type coolant, often older models with traditional materials. Always check your engine’s specifications before choosing a type.
What is the difference between G11 and Organic NF?
The main difference lies in the composition and lifespan of the coolant.
G11 is a traditional coolant with silicate additive. It offers rapid protection but degrades faster, necessitating more frequent replacement. G11 is particularly suited for older engines designed for it.
Organic NF (OAT technology) is a more modern, silicate-free coolant. It works with Organic acids which act more slowly but last much longer and protect the system better against corrosion in the long term. This variant is usually better suited for newer engines with aluminium components.
Choose the best coolant at AB Marine Servicee
Change your coolant every 2 to 3 years, even if there’s still plenty in the tank. Make a note of the date after changing it somewhere in your logbook or on the expansion tank itself. That way, you’ll know when it’s time for the next change. Another tip: never mix two types of coolant.
Do you have any questions? Please feel free to contact us. We’re happy to help you make your choice. That way, you can keep your engine cool and your boat in top condition.