Replacing your boat’s fuel filter is a crucial part of maintaining your diesel engine. This filter prevents impurities, such as dirt and water, from reaching the engine via the fuel. Without a properly functioning fuel filter, you risk starting problems, reduced engine performance, and even serious engine damage.
In this blog, we’ll explain step-by-step how to install a new fuel filter, what tools you’ll need, and how to avoid mistakes. Whether you’re an experienced DIYer or just starting out, this guide will help you get started.
What you’ll need to replace a fuel filter
A good preparation is half the battle. Before you start replacing the fuel filter, make sure you have all the necessary materials and tools to hand. This will not only prevent delays but also minimise the risk of mistakes.
General supplies
For each type of filter, you’ll need the following items.
- Cloths or absorbent material: Essential for soaking up spilled fuel and keeping your workspace clean.
- A collection tray: For catching contaminated fuel and any lea.
- A new fuel filter: Make sure you choose the correct model that fits your engine. Consult the engine’s manual or seek advice from our specialists.
- Tools: Think screwdrivers, spanners, and filter pliers. These are needed for loosening and tightening the filter.
Specific requirements per filter type
- Screw-on filters: A filter wrench to unscrew the old filter. If necessary, a rubber sealing ring to ensure a perfect seal.
- Cassette types: Additional sealing rings. These are often supplied with the new filter, but always check that they are present.
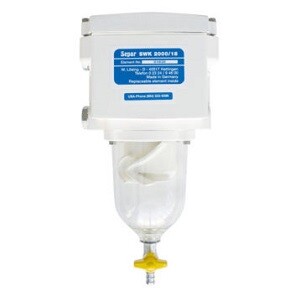
- Separ filters: A Separ filter is designed to separate water and dirt from fuel and contains a water-repellent filter element. It is important to check whether the filter element is reusable and if specific cleaning agents are required. Additionally, it is advisable to have a spare filter element to hand in case the old filter is full and no longer usable.
Step-by-step guide to replacing a fuel filter
Replacing a fuel filter might seem complicated, but with this structured approach, it’s a job you can do yourself. Below you’ll find a detailed guide per filter type.
Preparation
- Turn off the engine: Switch off the engine and wait for it to cool down completely. This prevents fire hazards and minimises the risk of burns.
- Work in a well-ventilated area: Fuel vapours can be harmful and flammable.
- Turn off the fuel supply: Close the fuel shut-off tap to prevent fuel from continuing to flow through the system during replacement. Check for any leakage at the valve, especially with older fuel lines.
- Place a drip tray: Place an oil and fuel-resistant drip tray under the filter to catch any leaking fuel. Use a rag to mop up any small spills immediately.
Replace screw-on filter
- Unscrew the old filter: Use a filter wrench to carefully unscrew the filter. Be careful to remove the rubber seal if it has been left behind on the engine, as a seal left behind can cause leaks.
- Check the new seal: Smear a thin layer of diesel oil onto the seal. This will ensure a better seal and prevent the filter from being overtightened.
- Fill the new filter with clean diesel: If your engine has a mechanical fuel pump, fill the new screw-on filter with clean diesel first. This will prevent air bubbles in the fuel system. (Note: with modern engines that have an electric pump, this is not necessary. With these, it can actually have the opposite effect and send dirt to the injectors. The engine’s manual is the definitive guide for this step.)
- Fit the new filter: Screw the filter on by hand until it sits snugly, then tighten it a further quarter turn. Do not use a filter wrench to tighten the new filter, as this can damage the seal.
Cassette types replace
- Remove the housing: Use the correct tool (usually a spanner or screwdriver) to carefully unscrew the filter housing and remove the old filter element.
- Clean the housing: Use a lint-free cloth to clean the inside of the housing. Avoid harsh cleaning agents as they can damage seals. Check for and remove any old seal rings left inside the housing.
- Install the new filter: Install the new cassette filter ensuring the sealing ring is correctly positioned and not twisted. Screw the housing on firmly, but do not overtighten to avoid damaging the seals.
Replacing or cleaning the separator filter
- Remove the filter element: Remove the filter element and dispose of the filter and old fuel.
- Fill the housing: Fill the filter housing with clean fuel and refit the filter. After refitting, check for fuel leaks at the connections.
Bleeding the fuel system
After replacing the fuel filter, you need to bleed the fuel system to prevent air in the lines from causing engine malfunctions or starting problems. Not all engines have manual bleeding, so check your engine’s manual for the correct procedure.
- Check if bleeding is necessary: Some modern engines with an electric fuel pump bleed automatically as soon as you turn the ignition on. Older or mechanical fuel systems need to be bled manually.
- Open the bleed screw: Undo the screw slightly until you see fuel emerging.
- Manually pump the fuel pump: Keep pumping until there are no more air bubbles in the fuel.
- Close the screw: Tighten the screw firmly, but not excessively to avoid damage, and start the engine to check that it runs smoothly.
Common mistakes and how to avoid them
Replacing the filter yourself can be a challenge, especially if you’re unfamiliar with the procedure. Here are some common mistakes and tips to avoid them.
Using the wrong filter
A new fuel filter must always be compatible with your engine. Using an unsuitable filter can lead to leaks or insufficient filtration. Always check the specifications and use an original or manufacturer-recommended filter.
Bleeding the system incorrectly
Air in the fuel system can have serious consequences, such as starting problems or a poorly functioning engine. Ensure you always bleed the system after replacement.
Reusing old seals
When replacing a filter, it is important to also replace the sealing rings. A damaged ring can lead to fuel leakage, which is not only inefficient but also dangerous. Always use a new sealing ring and check that the old ring has not been left behind on the engine.
Tightening the filter too much or not enough
A common mistake is overtightening the filter, which can damage the sealing ring. Conversely, a loose filter can cause leaks. Tighten the filter by hand until it seats properly, then give it an additional quarter turn. Do not use tools to tighten the filter unless specified by the manufacturer.
No preventative maintenance
Ignoring a clogged fuel filter can lead to severe engine damage. Regularly carry out preventative maintenance to extend your engine’s lifespan. Therefore, cleaning your fuel filter is a worthwhile endeavour.
Why a well-functioning fuel filter is important
A fuel filter plays a key role in ensuring your engine runs smoothly. It prevents unwanted particles, like dirt, rust, and water, from entering the fuel and subsequently the engine. If this happens, it can not only reduce engine performance but also lead to serious damage.
Protection against serious damage
When the filter loses its capacity to trap impurities, they can still enter the engine. This can damage the injectors or even lead to damage to the fuel pump. Injectors are highly precise components that are extremely sensitive to dirt and water. A damaged injector requires costly repairs or replacement.
Optimal fuel consumption
When a clogged fuel filter causes reduced flow, the engine has to work harder to draw in fuel. This not only leads to higher costs due to increased fuel consumption but can also result in reduced engine performance, such as a decrease in power and speed.
Longer engine life
A clogged fuel filter can have serious long-term consequences for your engine’s lifespan. If dirt and water enter the engine, they can cause corrosion in the fuel lines and vital components, such as the injectors and fuel pump. Furthermore, these impurities can cause the engine to overheat more quickly or even seize up completely.
How to recognise a clogged fuel filter?
It’s important to know when a fuel filter is getting clogged so you can intervene in good time. Here are some common symptoms:
- Starting problems: A blocked filter can impede the fuel supply, making it difficult to get the engine going.
- Reduced engine performance: If you notice the engine is losing power or running unevenly, a blocked filter could be the culprit.
- Increased fuel consumption: An inefficient fuel system due to a blocked filter causes the engine to use more fuel than usual.
- Rough idling: When the engine doesn’t run smoothly at idle, it can indicate a blockage in the filter system.
- Smoke from the exhaust: Excessive or dark smoke can be a sign that the engine is struggling to combust fuel properly due to a lack of clean fuel.
- Warning light: On some modern engines, a dashboard warning light may indicate that the filter is full and needs replacing.
If you notice one or more of these symptoms, it’s advisable to check the filter straight away and likely replace the fuel filter as a precaution. Want to know how to test when your fuel filter needs replacing? Then read our other blog where we explain when to change a fuel filter.
Replace the boat’s fuel filter yourself
Replacing the fuel filter is a relatively simple job that is important for maintaining the performance and lifespan of your engine. With the right preparation, the correct tools and this comprehensive guide, you can carry out this job yourself.
Do you have any questions or are you unsure which filter you need? Get in touch with our experts. They’ll be happy to help you!